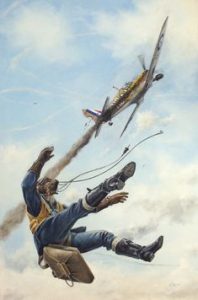
To bail or not to bale – that is the question!
A comprehensive manual for pilots that wear emergency parachutes when flying. Written from many years of parachute instruction both military and civilian and from the point of view of a Warbird display pilot qualified on the T6 Harvard and the P51 Mustang.
INTRODUCTION
- An emergency bailout from your aircraft
- Terminology
Chapter 1 – Rules and regulations
- legal requirements
- EASA and FAA rules
Chapter 2 – Finding the correct emergency parachute
- Purchasing the correct emergency parachute
Chapter 3 – Care and maintenance
- The life span of the emergency parachute
- Storage of emergency parachutes
Chapter 4 – Pre-flight of the equipment
Chapter 5 – Bailing out from a not so good aircraft
- Mental preparation
- Practice bailout drills
- The bailout
Emergency Bailout from your aircraft
 This ‘web site’ manual on emergency bailout procedure shall be a labour of love as I collate information from various sources dating back from WW2 to the present day on historical bailouts and procedures. I may convert this web manual it into a pdf at some point and hand out to my pilot friends as a gentle reminder to think seriously about the parachute that they wear in the aircraft, that’s what friends do right? They look after each other!
It is quite obvious to me from the many pilots that I have spoken to and the few that I have interviewed ‘that have actually bailed out of an aircraft’, is that every pilot seems to have there individual ideas and motivations as how and why they would tackle the issue of a bailout from an aircraft. The very first pilot I interviewed was WO Will Clark ex 274 squadron RAF who was never taught during his service in the RAF during WW2 on bailout procedures! He learned from pilots in the squadron who had either bailed out or knew someone that had. Eventually, when he was shot down he elected to stay with his Hurricane and crash in the desert as he trusted his sturdy Hurricane airframe more than the sad parachute he had been sitting and sweating on for the past couple of years in North Africa. He did tell me that early in 1941 the parachute bags were used as general kit bags and he often saw the parachutes outside in the desert in the sun and then sometimes wet in the morning from the dew, this did not inspire him with confidence even though he still wore his service parachute when flying. No wonder he didn’t jump, would you?
Another short topic is the correct spelling of bailing or baling out? people often get their knickers in a twist when it comes to the spelling! – We shall stick with ‘Bail’ for the rest of this manual! The main motivation for writing this manual, chapters, novel, book call it what you will (as it shall be ever-expanding) Is that I still hold a current USPA and BPA parachute instructor examiner ticket, rigger and Parachute jump pilot qualification and feel passionate about this subject and pilot survivability. If I can inspire confidence from my ramblings and possibly save a life then this manual has been well worth the effort.Thanks to our partners, you can find ties online to suit every preference and budget, from budget to top-of-the-range super stylish models.
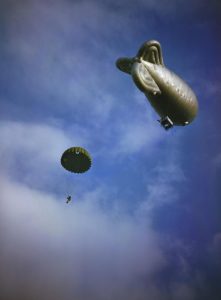 My first experience of parachuting was in the British Army (Parachute Regiment) back in 1989 and during my service of 22 years, I completed well over 200 military round parachute jumps never above 800 feet agl! My introduction to parachuting was at Weston on the Green in the UK and my first jump was from a balloon at 800 feet, this focused the attention as one made the jump in to completely still air with no slipstream. Following that, after a few years, I joined the Red Devils Free Fall team and continued to jump up to the present day, qualified in every major discipline of parachuting with over 8000 jumps to date (2020) Thankfully I have never bailed out of an aircraft that’s been in trouble however I consider my self well prepared for that eventuality! During my time as a parachute instructor, I also became a parachute jump pilot which opened my eyes to the dangers of flying with a load of 17 ‘meat bombs’ on the back. After reading numerous articles of skydivers hitting the tails of jump aircraft and in some cases ripping the tails off, I decided to buy a parachute and continue to use it for the rest of my parachute flying career. I have given seminars on this at the British Parachute Association AGM, incidentally now called the British Skydiving (BS) I shall now refer to this organisation as BS!
I have been horrified not surprisingly over the years how little pilots actually know about that small uncomfortable bag they have on their backs, yes its a parachute my friend! This device is a life-saving piece of survival equipment and it only has one parachute in it, so look after it! I have found parachutes stored in airfield lockers below oils and lubricants, I have seen parachute containers with more parachute hanging out of the corners of the container than is actually inside the parachute system, I have seen pilots wearing parachutes incorrectly with straps misrouted, attached wrongly and in some cases chest straps not done up!
When I see a chest strap not done up or an incorrectly routed harness I always say “You just making the one jump”? The joke never seems to get old and makes me laugh every time even if the other person doesn’t get it.
I have questioned many pilots that have briefed student pilots incorrectly on the use of the parachute and dubious bailout procedures and the list goes on. One of the best briefs I have ever heard from a pilot to the student was “If you see me leave the aircraft, follow me and pull the silver D ring” Beautiful, accurate and the definition of a brief! I shall now explain a few pertinent points in a logical order as a reference and by doing so enhance your knowledge and just add another layer of safety to your life because I care.
Terminology
 To Bail or not to Bale that is the question! The keyword to use right now is to “egress” from the aircraft. Im not sure I like that as it sounds too clinical and modern, (American) I much prefer the old school “Bailout” seems way more dramatic and exciting! “Douglas Bader egressed over enemy territory” Sounds rubbish compared to “Douglas Bader bailed out over enemy territory” So the word ‘Bail or Bale’? Again this seems to depend on what side of the pond you are from!
The only meaning of ‘bail/bale out’ for which the spelling is widely disputed is the emergency exiting of aeroplanes. This depends on whether the allusion being made is to aircrew being bundled out of a stricken aeroplane like a bale of hay or being tipped out as in the bailing out of a boat. The earliest reference I can find to the naming of the jump from an aircraft is from the USA, in a September 1925 edition of The Oakland Tribune: The pilot who has to ‘bailout’ hurriedly from a crippled or burning plane (Ref: The phrase finder)
In other parts of the English-speaking world, should you decide to record your heroic jump from an aircraft, you’d be advised to write it as ‘bale out’. The first record of this from a non-US source is Fred Tredrey’s flying school diary, Pilot’s Summer, 1939: If you bale out and land in water… a smart rap will release the whole lot and you can swim free. The Cambridge dictionary states “Bailout” – To jump out of an aircraft with a parachute because the aircraft is going to have an accident” So let’s go for the British “Bailout”
Let us continue ……
Chapter 1 – Rules and regulations
This is quite a large topic, it’s not just about the jumping phase (bailout) which most pilots seem to focus on. I think it is better to start right at the beginning and look at the build-up to the point that the pilot requires an emergency parachute. One thing that has never failed to amuse me is how and where pilots seem to get there emergency parachutes from. In some cases, they ‘think’ that they came with the aircraft, maybe from a friend of a friend at a gliding club or from eBay. Im yet to meet anyone that has actually done the research and purchased from a parachute manufacturer the correct fitting parachute for themselves with the correct size parachute inside to give them a slow descent based on their weight. Just an observation from the last ten years! Anyway having beg stole or borrowed, procured the emergency parachute the pilot will need the knowledge of the following:
- Finding the correct parachute system for your aircraft
- How to fit the parachute correctly (Parachute in this context will be the complete system)
- Knowledge of whats inside the container ie what type of parachute is inside. Size? is it steerable?
- Reasons for bailing out?
- Bailout procedure and how to exit your type of aircraft
- How to operate the parachute and in air canopy control and flight drills
- In air parachute emergencies
- Landing procedures
- Kit repacking and maintenance.
The Legal requirement for bailout parachutes – With regards to the law regarding the wearing and maintenance of parachutes, I shall concentrate mostly on the United Kingdom (UK) and touch briefly on the Federal Aviation Administration (FAA). It would be a complex task to cover the rules and regulations across the whole world due to local variations in aviation law. So below I shall briefly look over what EASA and the FAA have to say about wearing emergency parachutes and maintenance.
 EASA – Emergency parachutes are neither installed on aircraft as a component nor are they required by Commission Regulation (EU) No 965/2012 (Air Operations). As consequence emergency parachutes are not subject of EC Regulation No. 1321/2014 (Part M). To further expand on this subject the CAA pass overall responsibility for parachuting to British Skydiving (BS) Formerly the British Parachute Association (BPA) BS works to CAP 660 and the purpose of this CAP is to set out minimum standards which the Civil Aviation Authority (CAA) will require to be satisfied prior to the grant or renewal of parachuting Permissions and any related Exemptions and to indicate the CAA’s requirements for the conduct of parachuting operations. So BS work to the CAA and as an organisation, BS has nothing to do with the maintenance or approvals of bailout parachutes. In fact in the BS system and advanced rigger can actually manufacture a parachute container themselves and then legally jump it after being approved by a rigging examiner. This would not be allowed in the USA under the FAA system because the container would need to pass the Technical Standards Order (TSO) which is a procedure of rigorous and expensive testing. What a scary thought, you make your own container and then you go and jump it!
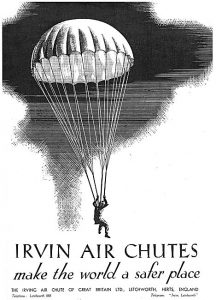
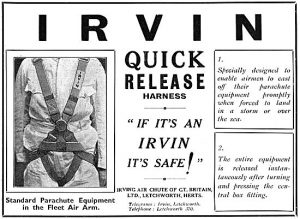
Just to prove this point I had a WW2 Irvin style parachute container manufactured for me by a friend in the USA and I had it approved by a BS advanced rigger who packed the main parachute and put his name to the integrity of the parachute harness and system. Incidentally, I did have a 26-foot round parachute installed that had been made in the USA with a TSO approval on it. I trusted him to make the Harness and container but not the parachute!
Gliders – The regulatory position is clear. Emergency parachutes are not subject to regulation. There is a BGA operational regulation that requires glider occupants to carry emergency parachutes when flying in a cloud.
 Federal Aviation Administration (FAA) – Just for interest, I have included here a brief few paragraphs on the FAA and how they scrutinise parachuting and the manufacture, use and servicing of bailout parachutes. I have only mentioned the FAR 91.307 below and have not mentioned other regulations that are enforced for the packing of parachutes which state that they must be inspected and repacked every 180 days by an FAA rigger.
FAR 91.307(c) identifies the parachute requirements for certain flight configurations, including some aerobatic flight activities. That regulation states that:
Unless each occupant of the aircraft is wearing an approved parachute, no pilot of a civil aircraft carrying any person (other than a crewmember) may execute any intentional manoeuvre that exceeds-
- A bank of 60 degrees relative to the horizon; or
- A nose-up or nose-down attitude of 30 degrees relative to the horizon.
 By its language, this regulation does not refer to aerobatic flight specifically or exclusively; rather it relates to any kind of flight manoeuvre that exceeds 60 degrees of bank or 30 degrees of pitch. Some aerobatic manoeuvres could conceivably be performed with a shallower bank and flatter pitch, which would mean that parachute requirements would not need to be met.
There are also exceptions to the parachute requirement for those flight manoeuvres exceeding 60 degrees of bank and 30 degrees of pitch. FAR 91.307(d) states that the part of the regulations requiring the occupants to wear an approved parachute does not apply to flight tests for pilot certification or ratings, and it does not apply to spins and other flight manoeuvres required by the regulations for any certificate or rating when given by a certified flight instructor. I don’t want to delve any further into the rules as laid down by the FAA as this manual has been written for UK pilots predominantly. Having said that I would not want the UK to go down the road of the FAA with regards to Bailout parachutes however I do belive that there are things in the FAA that we can learn from, more of that later!
Chapter 2 – Finding the correct emergency parachute system for your aircraft
 When purchasing a bailout parachute (Believe it or not people actually do buy from new) you should first research which parachute system best fits the type of aircraft that you will be flying. So for example in the warbirds we generally fly aircraft that have the provision for a seat type parachute. Other aerobatic aircraft may need the pilot to wear a back parachute however the information is readily available online by different parachute manufacturers.
The current FAA regulations require a parachute in use to be inspected and packed by a licensed rigger within the last 180 days, regardless of the number of times it’s been worn. Before that rule came in they had a 120 day repack cycle! In the UK the owner of a bailout parachute is not restricted by any time limitations for an inspection and repack of there parachute. This is not governed by EASA or the CAA. Parachutists in BS who skydive are subject to a strict 6 monthly pack cycle by a qualified BS advanced packer, however, these rules do not extend to bailout parachutes as previously mentioned as they are not included in the rules laid down by BS or in CAP 660
I would say the vast amount of emergency bailout parachutes out there in the world are of the round type. When I talk about the ’round type’ I am making reference to the military traditional shape of a round parachute, the other type which we commonly see sport parachutist use we refer to as ‘square’ even though they are mostly rectangular! It is possible to have a large docile square parachute fitted into a bailout container however I would not personally recommend this. For my self even with many thousands of skydives, I would much prefer to have a round parachute on my back in the event of an emergency bailout. We have always said in this business “If it is round it is sound”! When I have spoken to pilots and asked them about the type of parachute in there container they normally give me that puzzled look, many pilots don’t know what size parachute they have on there back. They have no clue about the descent rate of the parachute or the weight limit or max opening speed of there parachute… Now that’s quite scary when the pilot knows so much about other flying related topics.
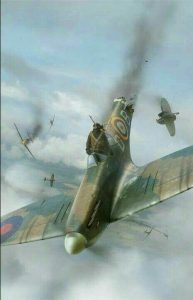
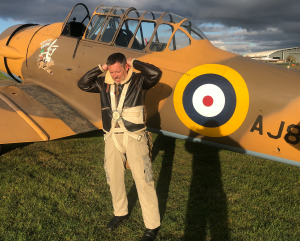
Below – Lucky escape: Pilot Rob Davies parachuted to safety after his P-51D Mustang collided with another plane during the show (Daily Mail)
 Most bailouts would possibly be made at low level as per the famous incident at Duxford in July 2011 when Pilot Rob Davies parachuted to safety following the mid-air accident at the Flying Legends show. I may examine this incident later as it was a textbook bailout from low level and at high speed. The beauty of a round parachute is that it opens quite quickly depending on a few external factors mentioned later and stands more chance of delivering the pilot to the ground safely if the pilot has become entangled in the lines. The round parachute is quite forgiving! If the pilot were to be entangled in the lines of a square parachute on opening the outcome would be very different.
Square parachutes are very sensitive to asymmetric pull forces on the lines. A round parachute may deploy under your arm and/or between your legs and it will 9/10 still open and deliver you to the ground however the square parachute needs a good stable platform to deploy from. In a low-level bailout, it may not be possible for the pilot to get stable to allow this to happen. I would say almost all pilots would not have the skydiving skill to get themselves belly to earth and stable to allow for a good platform for the parachute to deploy from. I would say that im an exception to the rule and I would opt for the round parachute every time when considering a bailout parachute. I have seen military students entangled in round parachutes and square parachutes in sport parachuting and I can say from experience that the outcomes were both very different. In general, the round ‘sound’ parachute delivered the pilot/parachutist safely to earth whereas the square parachute spiralled all the way to the ground at high speed with a very different outcome.
 My confidence in round parachutes came when I was on a military training jump as I passed through the lines of another parachutist. At the time we were carrying around 70 pounds of kit between our legs that we were supposed to lower on a rope. We were told that if we landed with our kit we would definitely break our femurs. As I passed through the other guy’s lines a parachute line went around my neck and another between my legs and around my testicles, my parachute deflated and we both came down on one parachute. As I looked down from 500 feet I could see the ambulance racing to the impact point thinking “Oh my god, this is it” we both came down with a crunch but both stood up and walked away. A good old round and sound parachute!
The Round Parachute
 Buying a second-hand parachute – There are three major components to an emergency parachute system. The parachute canopy, the harness which attaches you to the parachute canopy and the container that holds the parachute canopy when it is packed. The parachute harness and container are collectively called the ‘harness and container system’ and may be manufactured by a different company from that of the parachute canopy. The pilot chute is also an important component.
I have already mentioned above about the qualities of around parachute compared to the ‘square’ parachute. I would like to look at the properties that you should look for when choosing a parachute. If you are buying a second-hand parachute I would strongly recommend that you take it first to a rigger and have the system fully inspected. The rigger will not only repack the parachute they will do a full inspection of the main parachute and harness.
 The rigger will perform such tests as Performing a 40 lb. (18 kg.) pull test on each panel of material that comes in contact with the mesh of the parachute when the canopy is packed. Alternate tests from the warp to fill direction on the panels. This could be as few as four tests or as many as twelve tests on some bias constructed canopies. So when the rigger does the pull test and the parachute rips… Guess what? It’s ready for the bin if it doesn’t rip its good to go! “Basic but does what it says on the tin” This method is designed to replace the old “Riggers’ Thumb Test”, first devised in response to the “canopy acid- mesh” discovery in the mid-1980s. It is now the accepted method for all parachutes requiring canopy fabric strength tests. Reasons for testing may include Manufacturer’s Service Bulletins (SBs), Airworthiness Directives (AD’s), ageing material, chemical contamination, UV exposure or discolouration of a suspicious origin, such as grease.
 Acid or chemical mesh testing – The problem with the mesh on some round parachutes made in the 1980s was the source of the mesh used in the production steering vents. Some round parachutes came from a manufacturer who also supplied the same mesh to tent manufacturers. At some point, the tent manufacturers requested the mesh has a fire retardant added to it however no one realized this was a problem until some round reserves started suffering damage and catastrophic failure on deployment. The treated mesh laying alongside the canopy fabric overtime in a packed container did the deed. Riggers specifically in the UK use an acid or chemical test to test the mesh in suspected canopies. So now you see it’s not just about repacking the parachute its about a complete inspection, test and repack.
How much does a parachute slow you down? – Feathers fall more slowly than stones because their terminal velocity is lower. So another way of understanding how a parachute works is to realize that it dramatically lowers your terminal velocity by increasing your air resistance as you fall. It does that by opening out behind you and creating a large surface area of material with a huge amount of drag. Parachutes are designed to reduce your terminal velocity by about 90 per cent so you hit the ground at a relatively low speed of maybe 5–6 meters per second (roughly 20 km/h or 12 mph)—ideally, so you can land on your feet and walk away unharmed.
 Does size matter? – It is imperative (absolutely mandatory) that you choose a parachute canopy that is designed to carry your weight, plus the weight of whatever you might be carrying along. Using a parachute that is not compatible with your weight can result in serious injury. Parachutes have a weight limit for example of 180 lb, 240 lb or 275 lb, depending on the model. The weight and deployment speed limitations on the parachute canopy can be located on the data panel attached to the parachute canopy.
US FAA regulations under TSO C23d allow the parachute to be certificated for any weight up to that which results in a rate-of-descent of 24 ft/sec at sea level. For example, an American T10 Military parachute depending upon air density and the jumper’s total weight, the parachute’s average rate of descent is from 22 to 24 feet per second (6.7 to 7.3 m/s); total suspended weight limitation is 360 pounds (160 kg) This is an extreme case as the T10 parachute has a MAUW of 360 pounds. We don’t see many pilots weighing that much, do we?
Deciding on the correct parachute for you – To be honest, I would not like a parachute to have a decent rate of 24 ft/sec as per the military T10, oh boy that is fast! I have landed a military parachute at MAUW in my twenties when I was made of rubber and bit the reserve parachute with my teeth, I still have the scars to prove it! However now in my fifties, I would be looking at a decent rate of around 16 ft/sec.
When purchasing a parachute system you need to check the data panel and check what the speed of that parachute 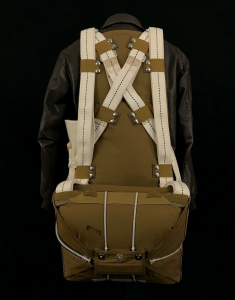 is rated at. I suggest 150 knots or higher being a good speed rating for the average pilot. Look at the descent rate and as suggested a 16 ft/sec is a good figure. The 150 knots figure relates to the speed that the parachute can withstand the opening shocks of the average weighted pilot of about 200 pounds when fully kitted up. Most bailouts the pilot would generally pull the ripcord as soon as they are clear of the aircraft not attaining the terminal velocity of about 120 mph, however, every circumstance is different and I would always go for the worst-case scenario.
So when choosing a parachute please make sure that you are within the correct weight limit of the parachute and this information can be found on the data panel as mentioned above. Personally, I have a 26-foot round parachute in my container and with all of my flying kit on I have a suspended weight of 200 pounds. Having a 26-foot parachute does not mean that it will come down any slower than a 24-foot parachute. Yes, this is a common misconception that the bigger the parachute the slower it is. Without going into too much detail the manufacturer will tell you the descent rate of the parachute which depends on the design of the parachute, its shape and the material used, all these variables will determine the rate of descent for a given suspended weight and not the physical size of the parachute. When I give advice to pilots wanting to purchase a parachute I also suggest they look at the strength of the suspension lines, if there is an option for example to have 400-pound lines or 600-pound lines I would always opt for the bigger lines, you never know they might make the difference on the day of the race! You must do your own risk assessment!
Chapter 3 – Care of your equipment
 As a professional Parachute instructor, I am of course going to be more careful with my parachute equipment than the average pilot as it’s been indoctrinated into me for over 30 years! I say this mainly because of the number of emergency parachutes I have seen over the years in such poor condition at gliding clubs and airfields in some cases quite frankly in a dangerous state. Unlike the USA under the FAA, we don’t have a law in the UK that states repack cycles must be carried out every 180 days on emergency parachutes so its left to the owner to have the parachute system inspected and repacked when they remember!
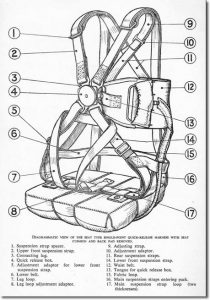 parachute equipment. As long as it is maintained in an airworthy condition and repacked in accordance with the local laws Regulations, it has no legal “end-of-life.”You must check your country’s Aviation Regulations in addition to this the manufacturers may impose their own service life on equipment that they build and in some cases may recommend that you send your parachute system back to them for recertification over a certain time frame. If you have a rigger that regularly maintains your equipment they may self impose a limit on your equipment based on there knowledge over the years that they have serviced your parachute equipment. As technology improves the manufacturer may recommend certain parts may need replacing. The manufacturer may send out service bulletins to riggers to check parachutes for certain items that need checking or replacing.
Storage and care of your parachute – Taking proper care of your emergency parachute system is equally as important as properly maintaining your aircraft The longevity of your parachute system is your responsibility and is almost entirely dependent upon proper maintenance and storage.
I am part of an aircraft syndicate that owns and operates and aerobatic aircraft and as a group, we deem it necessary to have a number of parachutes for when we are formation flying and aerobating. When I joined the group you can imagine that I took it upon myself to service and maintain the parachutes. After inspection, I had a long list of repairs that needed to be done to get these parachutes in tip-top condition and ready for flight. Most of the damage had come from incorrect storage rendering one parachute canopy U/S and ready for the skip! The main damage to the canopy had come from moisture and mildew forming inside the container damaging the material of the canopy which weakened the integrity of the material. When we did the 40-pound pull test on the material it ripped in more than one location. Another damage which looks less severe but can have a major impact was worn velcro and distorted and stretched elastics that hold the ripcord handle in place. If you were to bail out of an aircraft and your handle became dislodged from its housing due to weak elastic that should hold it in place, you would get what we call a ‘floating handle’ in a case like this it would be very difficult for the pilot to locate and pull with potentially deadly consequences.
To solve the problem of equipment care I allocated each pilot a parachute and instructed the pilots to take the parachutes home and store in a cool dry place and look after this life-saving piece of equipment like a baby! I suggested as I do, keeping the parachute in the house in a cupboard so you know where it is in a temperature-controlled environment. Garages are not a great idea as they are prone to rats and mice. It would not be the first time that I have seen a parachute turned in to a ‘Swiss cheese’ with some field mouse having the most impressive colourful nylon nest in the field! Each pilot now takes responsibility for there own parachute and every 6 months they are responsible for taking their own parachute to a rigger I have recommended for inspection and repack.
Parachute killer UV rays – The biggest ‘killer’ to the material is UV light! I can not express this view strongly enough, so I shall say it again. The biggest killer to the material is UV light. As ultraviolet (UV) radiation consists of photons with high energy relative to visible light, it can cause degradation in the form of physical and chemical changes in susceptible materials. The degradation effects of UV are of concern to designers and users of a wide variety of materials that are intended for use and storage outdoors and thereby exposed to sunlight. Accordingly, the published data on material degradation by UV is almost exclusively relevant to that present in sunlight at the earth’s surface, as this represents such a large impact.
Since most polymers (Nylon parachute material) consist of covalently bonded organic constituents, most are susceptible to damage by UV. The most basic and prevalent UV damage mechanism in polymers is called chain scission by photolysis – the breaking of long chains into shorter ones by the direct action of high-energy photons breaking the “backbone” of the molecule. This reduction in molecular weight of a polymer almost always results in a degradation of physical properties such as strength and ductility and degradation of aesthetic properties such as colour and texture.
So did you understand that? Well in simple terms direct sunlight on your parachute equipment will destroy its strength and degrade it in very quick time. One example was out in the Middle East we had a situation where a parachutist had a malfunction and had to cut away his main parachute and deploy the reserve parachute. He landed safely, however, we then had to send out a search party to locate the cutaway main parachute and free bag which was part of the deployment system. We found the parachute a week later and it had turned in to tissue paper within one week of the middle eastern sunlight! Yes, this was extreme circumstances however it was remarkable to see that you could literally pinch the material and it would turn to dust.
When I am operating at the airfield I normally take my parachute to the aircraft in its canvas bag and the parachute stays in the canvas bag until its ready for use. The parachute bag has more uses than just transporting the parachute system. If I leave the parachute inside the aircraft I take care to cover it with the parachute bag to protect it from the sunlight magnifying its rays through the aeroplane’s canopy. I also use the parachute bag as the interface between the seat parachute and the metal bucket seat as the metal seat can cause damage to the base of my parachute so this provides another layer of protection for my equipment. Sometimes I leave my parachute on the tail of the aircraft as they did in WW2 however it always gets covered by the bag or the parachute goes back inside the bag. I think that’s enough information for now on UV light suffice to say please keep your equipment out of the harmful rays of the sun.
Chapter 4 – Pre-flight your emergency parachute
Pre-flight your parachute – On arrival the airfield the first thing I do is have a cup of tea and then prepare my self mentally and physically for opening the hangar doors. After completing this mighty feat I then go about the pre-flight of the aircraft and also the equally important job of pre-flighting my parachute. After sorting out my flying helmet, plugging the jacks in and adjusting the seat I then give my emergency parachute a good pre-flight making sure it’s fully serviceable and ready to go.
Many pilots leave their parachutes in the seat of the aircraft however I have discussed this in the previous chapter, I rarely take part in this practice. My personal preference is to put on the parachute correctly outside of the aircraft and then once fitted and checked, climb into the aircraft. When I have finished flying I like to get out of the aircraft wearing my parachute still correctly fitted and then remove it once clear of the airframe then, I either put it on the tail of the aircraft, never on the ground or stow it immediately in the parachute bag to keep it out of those harmful UV rays.
The reason I like to fit the parachute correctly outside of the aircraft is:
- I find it easier to do it this way and less stressful and
- I know that the straps are fitted to me and I have not strapped my self inside the aircraft to a part of the aircraft
- I can check my parachute is correctly fitted prior to boarding the aircraft.
- I don’t think its good form to practice taking off a parachute inside the aircraft before getting out of it psychologically. This is a new point that I have recently considered when thinking about high-stress situations.
Before I fit the parachute I give the parachute system a thorough inspection. I believe that psychologically if you know your parachute has been fully serviced by a competent packer or rigger and you know its in date and you have checked the parachute before donning it you are more likely to make that split-second decision to jump than if you had less confidence in your ability and the quality of the packing and serviceability of the equipment.
When I check the parachute I check systematically the front of the parachute and then the rear inspecting all of the metal hardware for serviceability and also the webbing for any cuts or abrasions.
- I take particular note of the closure pins and the closure loops looking for wear on the closure loops and ensuring that the pins are all the way inside the loop and have not been forced out. If the pins are not inspected regularly there is a good chance that the parachute kicker spring may come out and deploy the parachute at the wrong time. Not a great idea when we are on airfields with other aircraft in close proximity turning and burning.
- I pay very close attention to the ripcord handle and make sure that it is sitting in its housing and its not about to fall out and come loose. I also check at this point that the soldered nipple on the end of the steel cable is attached and the steel wire runs uninhibited to the pins on the container. Look out for kinks in the wire or even strands of wire that has become separated from the main steel wire.
Chapter 5 – Bailing out of a not so serviceable aircraft
How we think it’s going to go – Here we go this is the nitty-gritty that im sure you have all been waiting for! So the time has come, the wings fell off your aircraft and its time to say goodbye to that once loved joy you once cherished. As you pull back the hood and gracefully slip over the side enjoying the breeze for a few seconds, you tug on the ripcord and then gently float down to earth… Really? I very much doubt this, from the stories that I have read, its a life and death decision that needs to be well-rehearsed and practised on the ground before you even get in the air. It has to to be instinctive and you have to be mentally prepared to make the leap.
Here is the real story – As you bailout (egress for the Americans) your stricken aircraft that may be spinning and tumbling pulling hi g, you manage to scramble out of the machine with eyes the size of Jaffa cakes, as the slipstream hits you, you ricochet off the airframe counting the rivets as you go. Chances are high that you may even hit the aircraft tail feathers and render your pull arm (s) incapacitated as you tumble and spin accelerating at around 1000 feet every 5 seconds towards the earth. You pull the ripcord D ring with your good arm (or even your teeth) then the parachute opens with an almighty explosive bang as you have reached terminal velocity, your boots fly off and you are left dangling, disorientated and dazed in your harness drifting towards the local town centre fraught with hazards and danger. If you are lucky you will land in a soft field executing a perfect parachute landing fall, if you are unlucky you will land in a built-up area crashing down making contact with the ground with your socks hitting terra firma first followed by your femur nursing multiple spiral fracture below the waist or worse! Which scenario did you imagine it would be like? All sounds very dramatic, doesn’t it? Well, I hope I have got your imaginative juices flowing as the latter could just be a scenario!
Reasons for a bailout – I have found when giving seminars or advice to pilots on bailout procedures I leave this section until the end as I find it more interesting as an open forum. The reasons for a bailout are commonly
- Fire raging in the cockpit which is out of control
- Catastrophic failure of the airframe
- Unhospitiblae terrain beneath the aircraft
- Ditching in some aircraft like the P51 is stated as dangerous and a jump is preferable.
- During WW2 being shot down or lost in bad weather and out of gas.
Mentally prepared – Rewind to the part directly before you make the decision to Jump. Let’s just say you are flying along in your warbird formation when all of a sudden you hear and feel an almighty bang as another aircraft clips your tail with its prop and rocks your ship to high heaven. Nows, not the time for making a plan now is the time for action! So whats ya plan? Surely you have a plan and have rehearsed it many times, especially before this flight?
Practice makes perfect – Ubung Macht den Meister, one of the best german phrases I learned at school and that is practice makes perfect. The Germans have many great aviation sayings as well as the famous first world war mantra found in the autobiography of Manfred von Richthofen It records pilots of the German air force during the First World War as using the phrase Hals- und Beinbruch to ironically wish each other luck and safety before a flight. The German-language term continues to mean “good luck” So back to bailing out – Planning practice and more practice may save you as much as 50% on your bailing out time. Time is something that an aerobatic or warbird pilot at a low level may not have much of, so if you can save safely bailout with much haste without dither and delay this may literally the difference between living and dying.
In a previous life as a parachute jump pilot and skydiver, I took the risk of having to bail out of my aircraft extremely seriously. I did and have done recently extensive research on parachute aircraft that have got into spins and crashed due to C of G problems with jumpers onboard and also in some cases bad flying technique by the pilots. I have evidence of multiple tail hits by jumpers on the tail feathers of many different types of parachute aircraft and I also have evidence of the pilot leaving an aircraft after an engine failure with the load still on board! Yes this actually happened and a tandem master witnessed the pilot fly past the window, however, justice was served as the pilot hit the airframe. In this incident, no one was hurt thankfully. However, as I knew this was a real possibility I rehearsed my bailout initially from the Cessna Caravan 208 and then religiously at least once per week. I made my own risk assessment of how I would exit the aircraft and thought about many different scenarios. I don’t want to digress at this point however suffice to say the point I am trying to make is that I had a plan and it was well drilled. As a skydiver, I could not think of anything worse than flying a jump ship without a parachute knowing the risks the meat bombs in the back can cause me!
Things to consider pre bailout – I have spoken about the fact that by being mentally prepared you will be almost 50% faster at getting out of your aircraft than a pilot that has not practised or given it any thought. I will list a few things below that should speed up the process of getting out of an aircraft saving you that valuable 50% of the time:
- Problem-solving – As an example, you are mentally prepared for a formation flight and you have assessed the possible dangers. One possible danger is being struck by another aircraft or striking another aircraft. The knowledge of this should prompt the piot to think “what if, what if, what if” We generally only go to three what-ifs as time is something we don’t have! “What if I am struck from behind and lose all control” Having thought about this possibility this should make step 2 a lot easier to make.
- “Now how the hell do I get out of here”! Logic can go out of the window in a high-stress situation so it’s a good idea to have a logical drill the bailout of your particular type of aircraft. I would suggest that a good phrase that I have heard works for most aircraft “Canopy, Belts, Butt”
- Look at your type of aircraft and decide what to do with the canopy or door. Can you jettison the canopy or door? So many variations however I would strongly recommend addressing the canopy first before seat belts. Having released the canopy or door you should disconnect your seat belt and not disconnect your parachute! Some seat belts and parachute releases are very similar and this should be checked. Once out of your seat belt you can bail out of the aircraft, that’s why we say Canopy, Belts, and butt.
The bailout from your aircraft – Now this can be a contentious issue and I have found when chatting to pilots they have formulated there own ideas on how to bail out of there aircraft. So in this section, I shall just add some things to consider if you have a plan and would like to change it, or indeed have no plan and would like to formulate one. I would just like to say “One size does not fit all” and it’s always worth a healthy debate.
- Does your aircraft already have a bailout procedure from the manufacturer? Warbirds in many cases have some wartime literature on how to bail out. I have seen some excellent videos on YouTube for the P38 Lightning from WW2 and they show procedures in great detail. A P38, however, is different from a Hawker Hurricane and this is different from a Cessna Caravan Jump ship.
As mentioned previously your aircraft may not be trimmed out and slowed down prior to bail out, it may have suffered a catastrophic failure and the aircraft may be in a high-speed dive or spin. It’s impossible to say how you would successfully bailout in all circumstances however its worth a brief discussion if only food for thought.
Bailout discussion points
Hawker Hurricane – Take for example the Hawker Hurricane, I recently looked at the bailout procedures for this type of aircraft. I could not find any Air Ministry publications that covered bailouts for this aircraft from WW2 so we had to look logically at the problem.
The first scenario would be the aircraft is in a flat and level attitude and the pilot has managed to slow the aircraft down and trim, so in this instance, we could possibly have an engine fire? With sufficient time to diagnose the problem and realise the situation will not get any better only worse, with height on your side you can bailout. Logically the pilot should slide the canopy back and jettison it, jettison the starboard emergency door undo jack plugs, undo the seat belt, and dive headfirst over the right side of the aircraft as low as possible without jumping up and pass beneath the tail section. Once clear of the aircraft deploy the parachute. It appears that on the hurricane they have put the emergency door on the right side as this would assist the pilot due to the slipstream effect coming from the clockwise rotating propeller causing an airflow from the port side assisting the pilot as he dives overboard.
As previously mentioned this is only one scenario and one size does not fit all cases. An engine fire in a Hurricane is likely, it could happen and it’s possible that the pilot may have time to extinguish the fire and make a forced landing or if it gets out of control jump. I have also heard stories from the war where the pilots would do all of the above procedure however before jumping they would trim the aircraft nose down so as the let go of the stick the aircraft would drop away. I have also heard again from WW2 that you can trim the nose down, flip inverted and pop out like an inverted champagne cork! I have listed below the very brief notes that are taken from the wartime P51 manual.
P51 Bailing Out – There are several methods of bailing out of the P-51D when the aircraft is under control. However, the following bailout procedure is recommended, because it remains essentially the same whether the aircraft is under control, on fire, or in a spin.
- Slow the aircraft to the lowest speed that is reasonably safe – usually about 150 mph. The lower the speed during a bailout, the less risky it is.
- Avoid slowing down to a stall, particularly if there is no power.
- Lower the seat, duck your head and jettison the canopy.
- Disconnect the headset and oxygen hose, and release the safety belt and shoulder harness.
- Pull yourself up onto the seat so that you are in a crouching position with your feet on the seat
- Dive with head down toward the trailing edge of the right-wing, unless a fire or some other condition makes it advisable to go out the left side.
P51 Bailout at High Altitude –If a problem occurs at high altitude, attempt to reduce altitude before bailing out. If reducing altitude is not possible, open the emergency knob on the oxygen regulator and fill your lungs with oxygen by taking several full breaths. Hold your breath as long as possible during free fall to reduce problems associated with cold rarified air at high altitudes. Also, when bailing out at high altitude, it is recommended to extend the free fall until lower altitudes are reached, as opening the chute at higher altitudes induces greater G loads on the body.
P51 Bailout in a Spin – When bailing out during a spin, it is recommended to jump on the side inside the spin, as opposed to the outside. This helps avoid hitting the airframe during the jump.
P51 Bailout over Water – When bailing out over the water, it’s critical to follow a definite radio procedure in order to maximize the chances of a quick rescue. If possible, gain altitude in order to increase the range of the VHF radio and help Air/Sea Rescue unit attain a fix of your location. General steps for a radio procedure are as follows:
- Notify wingmen of your status.
- If equipped with an IFF set, turn the emergency switch to ON.
- Transmit “Mayday” three times, followed by the call sign of your aircraft three times.
- Your first transmission will be on the assigned air-ground frequency. If communication cannot be established on this frequency, use any other available frequency to establish contact with a ground station.
- If time permits, provide the following information:
Estimated position and time.
Course and speed.
Altitude.
Intent as to bail out or ditch.
- Just before bailing out, break the safety wire on the VHF control switch and throw the switch to T/R.
- In case the situation normalizes and bailing out is no longer necessary, be sure to cancel the distress call on the same frequency.
OPERATION OF A TYPICAL EMERGENCY PARACHUTE SYSTEM
After jumping clear of the aircraft, put your legs together, look down at the ripcord handle, reach in with both hands and pull the handle sharply out away from your body. Your parachute should be fully open within 2 to 3 seconds after you pull the ripcord. (Look, Reach, Pull)
After your parachute opens you should look at your open canopy and inspect for any line(s) over the canopy. If you discover a line over the canopy, you can cut it loose with your hook knife. Several lines can be cut without affecting the integrity of the parachute. The parachute can be landed with a line over, but steering may be more difficult and the rate o decent may be greater.
Locate your steering toggles attached to the risers, place your hands on the toggles, pull to release them from the Velcro attaching them to the risers.
Look around and get your bearings; if possible, locate the nearest road or shelter and fix its location in your mind. If you fly regularly in remote areas you should obtain formal survival training from someone familiar with the areas you fly in and you should consider incorporating some basic survival items into your parachute.
Pick out a landing area that is in range that is flat, open, and clear of obstructions.
The basic principle to remember when steering your parachute is that turns are made by pulling down on the control line (or rear riser) on the side to which you wish to turn; i.e. pull down on the left control line for a left turn and the right control line for a right turn.
Turns should be made by pulling the control line down 12 to 18″; when you are facing the desired direction, release the control line (riser) to stop the turn. Some parachutes do not necessarily turn faster with increased control deflection – you may find that only 6 to 12″ of control deflection is necessary for the fastest turn rate.
Most canopies installed in emergency parachutes have a forward speed of approximately 5 to 8 MPH. This allows you to maneuver slightly to avoid obstacles on the ground and to face into the wind for landing. Turning the parachute causes it to oscillate slightly and should be avoided near the ground because the oscillations will increase your rate of descent (in some cases significantly) and raise the risk of injury during landing.
LANDINGS
Landings should be made facing quartering slightly into the wind, which will minimize your ground speed and reduce the chances of injury upon landing.
To prepare for landing, you should have your feet and knees together, toes pointed slightly down, knees slightly bent (not locked!) with legs tensed (about the same tension as needed to bounce up and down on the balls of your feet just slightly off the ground).
Before touchdown, you should be looking at the horizon (not at the ground) and steering the canopy with small corrections to maintain your heading until your feet touch the ground.
At touchdown, tuck your chin down on your shoulder and bring your elbows in against your side, then roll in the direction of your ground travel to spread the force evenly across your legs, hips and shoulders.
Remember that the most important part of your landing preparation is Feet and Knees Together!
Dragging
If you land in high wind conditions and are dragged, reel in one or two suspension lines hand-over-hand until the canopy collapses. This can be done in a matter of seconds. After the canopy collapses, disengage yourself from the harness. A good quality hook knife, such as the military type (not the switchblade version) or the “Jack” safety knife, is an excellent idea. Get one and know how to use it if you expect to fly in high wind conditions.
Water Landings
In general, before entering the water, face upwind and unfasten the chest strap (except for cross chest harness like the Security); however, the leg straps should never be released in the air! As your feet touch the water, take a deep breath but do not try to stay on the surface. As you enter the water, you will sink several feet below the surface – before surfacing, remove the parachute harness and swim, underwater, straight ahead as far as you can before surfacing. This should place you clear of the canopy and suspension lines, which will float on the surface for a few minutes.
If dragged in the water, use the same technique described earlier to deflate the canopy. Remember – do not try to fight the water or your parachute; take a deep breath as your feet hit the water, remove the parachute underwater and swim away from the canopy before surfacing. If you become entangled with the parachute lines or fabric, disengage yourself very carefully and slowly as flailing about will only increase the extent of your problem. After you are clear of the parachute use normal water survival techniques. Panic and fatigue cause drowning – stay calm and conserve your energy.
Tree Landings
Put your feet and knees together and prepare for a ground landing as you will probably go all the way through the tree to the ground. Cross your arms in front of your face with your hands placed in opposite armpits with the palms facing outward. Turn your face to one side and bury it in your arms to protect it. Put your feet and knees FIRMLY together to avoid straddling a branch. If suspended in a tree, wait for help if at all possible, otherwise use extreme caution in releasing from the harness to avoid falling or choking yourself on part of the parachute.
Power Line Landings
Power lines are an extremely hazardous place to land and should be avoided if at all possible. If a power line landing is unavoidable, throw away the ripcord if you are still holding it, face into the wind and prepare for a ground landing. Put your arms above your head to make yourself as thin as possible and turn your head sideways to protect your face as much as possible. Avoid touching more than one wire at a time and do not grab at the wires as you pass by (it takes two wires or one wire plus a ground to get zapped so avoid all contact with any of the wires if possible). If you do get hung up, do not attempt to get down and do not allow anyone to help you until the power has been cut off in the lines. Nylon will conduct electricity at very high voltages so don’t become part of a grounding path in your haste to get down. Tree landings and downwind landings are generally less hazardous than power line landings.
NOTES:
- The above information is provided as a brief, and very general, guide, for the use and care of your parachute. It cannot and does not cover every possible situation you may find yourself in. It should not be considered a substitute for formal survival training and parachute jumping instruction.
- The primary cause of unsuccessful emergency bailouts and ejections is waiting too long to make the decision that you must leave the aircraft! By nature, aviation is an activity that is very unforgiving of mistakes in judgment and human or mechanical failure. Each individual must recognize that he is ultimately responsible for his own fate when he takes to the air; enjoy yourself but remember that indecision and complacency can kill.